


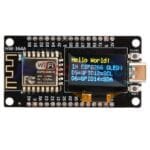
ESP8266 NodeMCU 0.96 inch OLED Display CH340 Development Board
This development board combines the popular ESP8266 microcontroller with a convenient OLED display, creating a powerful and compact platform for IoT projects that require visual feedback. Let’s break down its key features and benefits:
Core Components and Features:
- ESP8266 (ESP-12F Module): This is the heart of the board, providing Wi-Fi connectivity (802.11 b/g/n) and processing power. The ESP-12F is a surface-mountable module, known for its good performance and integrated antenna.
- 0.96 Inch OLED Display: This small display offers a crisp and clear visual output, ideal for displaying sensor readings, status messages, or simple graphics. OLED displays are known for their high contrast and low power consumption.
- CH340G USB-to-Serial Converter: This chip simplifies the connection between the ESP8266 and your computer via USB. It allows for easy programming and debugging.
- Micro USB Port: Used for both powering the board and programming the ESP8266.
- NodeMCU Firmware: The board typically comes pre-flashed with NodeMCU firmware, which allows you to program the ESP8266 using the Lua scripting language. However, it’s also compatible with the Arduino IDE and other development environments.
- GPIO Pins: The ESP8266’s GPIO pins are broken out, providing access to a wide range of functionalities. These pins can be used to connect sensors, actuators, and other peripherals.
Advantages:
- Integrated Display: The built-in OLED display eliminates the need for external displays, making prototyping and development more convenient and compact.
- Wi-Fi Connectivity: The ESP8266’s Wi-Fi capability enables the board to connect to networks and send/receive data, making it ideal for IoT applications.
- Low Power Consumption: Both the ESP8266 and the OLED display are designed for low power consumption, making the board suitable for battery-powered projects.
- Easy Programming: The CH340G and NodeMCU firmware (or Arduino IDE compatibility) make the board easy to program, even for beginners.
Versatile Applications:
This board is suitable for a wide range of IoT projects, including:
-
- Weather Stations: Displaying temperature, humidity, and other weather data on the OLED screen.
- Sensor Monitoring: Visualizing sensor readings from various sensors (e.g., air quality, light levels).
- Home Automation: Controlling devices remotely and displaying their status on the OLED display.
- Wearable Devices: Creating small, display-based wearables for data logging or notifications.
- Custom Displays: Building small, standalone displays for specific information or alerts.
Development and Programming:
- Arduino IDE: The most popular method. You’ll need to install the ESP8266 board definitions and libraries for OLED control.
- NodeMCU (Lua): The original firmware for this type of board. If your board comes pre-flashed, you can start coding in Lua right away.
- Other Environments: Other options include using PlatformIO or the ESP-IDF directly.
Key Considerations:
- Power Requirements: The board is typically powered via the micro USB port. Ensure you have a stable power source.
- Pin Assignments: Refer to the board’s documentation or schematic to understand the pin assignments for the OLED display and other peripherals.
- OLED Libraries: When using the Arduino IDE, you’ll need to install appropriate libraries to control the OLED display.
Common ones include
Adafruit_SSD1306andU8g2lib.
In Summary:
The ESP8266 NodeMCU Development Board with a built-in OLED display is a great choice for IoT projects where visual feedback is essential. Its compact design, Wi-Fi connectivity, and ease of programming make it a versatile tool for both beginners and experienced developers. The integrated display significantly streamlines development by removing the need for separate display wiring and interfacing.
Pin Diagram:

Useful Products:
ESP8266 DHT11CH340 Development Board with built-in DHT-11 Sensor
ESP8266 ESP-01S WIFI Transceiver Module
ESP8266 ESP-12S WIFI Transceiver Module
Arduino UNO R3 Development Board
Arduino Nano Development Board
Arduino Mega Development Board
Raspberry Pi Development Board
Documents:
- NURDspace Wiki (Schematic, Datasheet, & More!)
- Instructables Tutorial
- ESP8266 Community Forum
- AT Command Set
- GitHub (ESP8266)
- GitHub (GCC-Xtensa)
- Graphical Datasheet

Reviews
Clear filtersThere are no reviews yet.