Arduino WiFi Shield with Integrated Antenna A000058
Overview:
The Arduino WiFi Shield connects your Arduino to the internet wirelessly. Connect it to your wireless network by following a few simple instructions to start controlling your world through the internet. As always with Arduino, every element of the platform – hardware, software and documentation – is freely available and open-source. This means you can learn exactly how it’s made and use its design as the starting point for your own circuits.
- Requires and Arduino board (not included)
- Operating voltage 5V (supplied from the Arduino Board)
- Connection via: 802.11b/g networks
- Encryption types: WEP and WPA2 Persoanl
- Connection with Arduino on SPI port
- on-board micro SD slot
- ICSP headers
- FTDI connection for serial debugging of WiFi shield
- Mini-USB for updating WiFi shield firmware
Description:
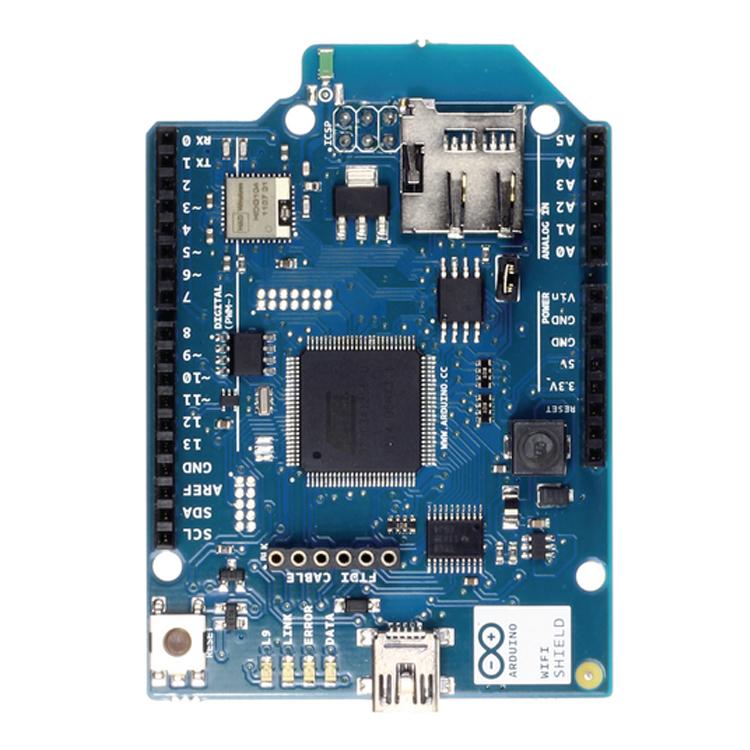
The Arduino WiFi Shield allows an Arduino board to connect to the internet using the 802.11 wireless specification (WiFi). It is based on the HDG104 Wireless LAN 802.11b/g System in-Package. An Atmega 32UC3 provides a network (IP) stack capable of both TCP and UDP. Use the WiFI library to write sketches which connect to the internet using the shield. TheWiFI shield connects to an Arduino board using long wire-wrap headers which extend through the shield. This keeps the pin layout intact and allows another shield to be stacked on top.
The WiFi Shield can connect to wireless networks which operate according to the 802.11b and 802.11g specifications.
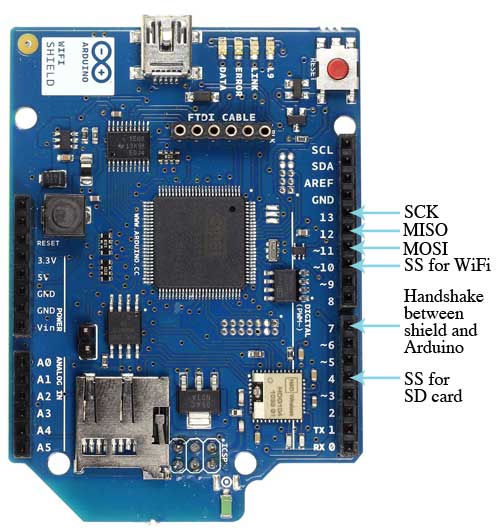
There is an onboard micro-SD card slot, which can be used to store files for serving over the network. It is compatible with the Arduino Uno and Mega. The onboard microSD card reader is accessible through the SD Library. When working with this library, SS is on Pin 4.
Arduino communicates with both the Wifi shield’s processor and SD card using the SPI bus (through the ICSP header). This is on digital pins 11, 12, and 13 on the Uno and pins 50, 51, and 52 on the Mega. On both boards, pin 10 is used to select the HDG104 and pin 4 for the SD card. These pins cannot be used for general I/O. On the Mega, the hardware SS pin, 53, is not used to select either the HDG104 or the SD card, but it must be kept as an output or the SPI interface won’t work.
Digital pin 7 is used as a handshake pin between the WiFi shield and the Arduino, and should not be used.

The shield contains a number of informational LEDs:
- L9 (yellow): tied to digital pin 9
- LINK (green): indicates a connection to a network
- ERROR (red): indicates a communication error
- DATA (blue): indicates data being transmitted/received
You must be logged in to post a review.
Related products
Arduino UNO R3 ATmega328P CH340G Development Board (SMD)
Base Shield V2
Bluetooth Shield for Arduino (Master Slave)
GLT240128-WB (LCD Graphic RS 232 BLU/WHT)
GPS Shield with Data Logger (SD Card) for Arduino UNO +
Raspberry Pi 3 Model B (1GB)
UNO R3 Sensor Shield V5 Expansion Board For Arduino
- Ready to plug & play.
- It can connect to various modules like sensors, servos, relays, buttons, potentiometers
- Each functional module has buckled port with VCC, GND and Output, which has corresponding port on the Sensor Shield, connected with a plain 2.54mm dual-female cable you may start playing already. Buckled brick cables are like cement for bricks, make the connections easier, secure and more professional looking.
WiFly RN-171
- Ultra low power for battery powered applications
- Firmware configurable transmit power: 0dBm to +12dBm
- Hardware interfaces: UART
- Supports Adhoc and infrastructure networking modes
- User programmable GPIO & ADCs
- Real-time clock for time-stamping, auto-sleep, and auto-wakeup modes
- Run directly from batteries or regulated power supplies
- Configuration over serial or wireless interface using simple ASCII commands
- Over the air firmware upgrade
- Secure Wi-Fi authentication schemes (WEP/WPA/WPA2)
- Full onboard TCP/IP stack (no external drivers required)


Reviews
There are no reviews yet.